Vytio IPTV Probe for Service Providers Guide
1. Introduction
TVProbe for Service Providers (or TVProbe SP) is designed for channel service providers to continuously monitor channel signal quality and effectively diagnosis any issues with the channels at customer sites.
The deployment and use of TVProbe SP is as follows:
1. Deploy TVProbe SP Manager at a Network Operation Center it
• Note: The installation of TVProbe SP Manager is outside the scope of this guide.
2. Deploy one or more TVProbe Nodes at one or more customer sites
3. Configure TVProbe Nodes to ensure that they:
• Report to TVProbe SP Manager
• Receive commands from TVProbe SP Manager regarding what channels to analyze
• Analyze channel quality and
• Report channel status to TVProbe SP Manager
4. TVProbe SP Manager sends alerts to assigned support engineers
5. Support engineers use the TVProbe SP Console to review alerts and channel status
6. Support engineers can decide the next course of action related to the issue:
• Alert video broadcast teams
• Headend equipment review
• Customer Service truck roll
• Remote system reset / configure
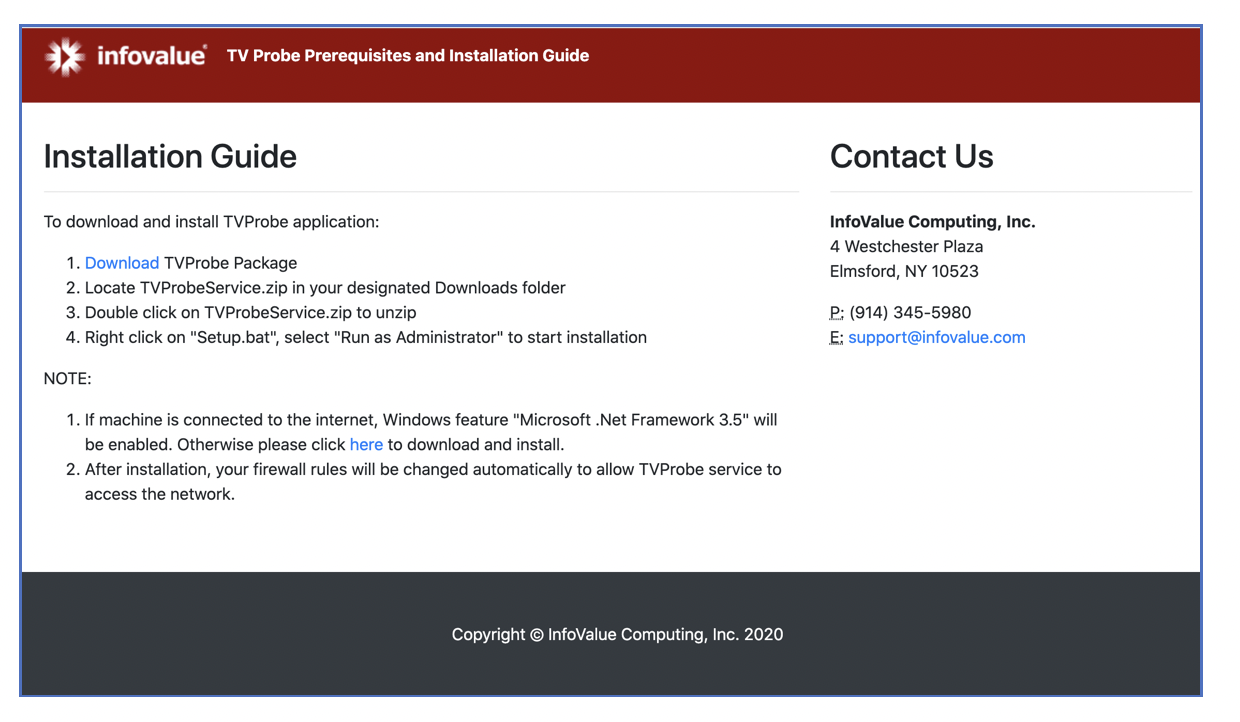
2. Install TVProbe Node
TVProbe Node software runs on Microsoft Windows 10 Professional, Windows Server 2012, 2016 or 2019.
To install TVProbe Node software:
1. Navigate a web browser to http://<server_ip>/tvprobeinstall, where <server_ip> is
TVProbe SP Manager’s IP address
2. Follow the instructions on the webpage to download and install the software
3. During installation enter TVProbe SP Manager’s IP address when prompted
3. Channel Status Reports
The channel reports provided by TVProbe Nodes have two aspects
1. Data and packets and
2. MPEG compliance
3.1 Channel Reports on Data and Packets
The reports on data and packets include:
1. Channel data rate,
2. Data stopped error - channel has no data for at least one second
3. Continuity Counter (CC) error - channel has lost packet(s)
3.2 Channel Reports on MPEG Compliance
The reports on MPEG compliance include:

4 TVProbe SP Console
TVProbe SP Console is the user interface for using TVProbe SP. It has tabs for Probe, Site, Channel and Account, and an alert pane.
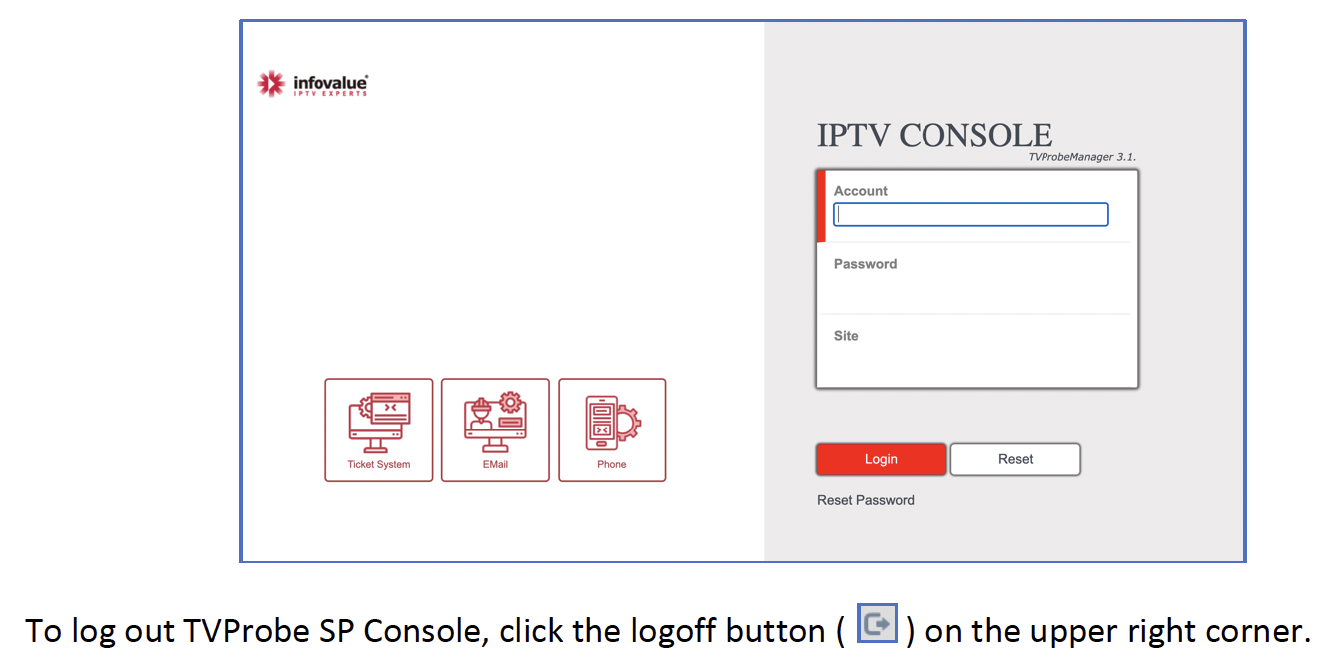
4.1 Access TVProbe SP Console
To access TVProbe SP Console:
1. Navigate a web browser to http://<server_ip>/tvprobesp, where <server_ip> is TVProbe
SP Manager’s IP address
2. If there is a “Site” field, ignore it.
3. Enter Account and Password information and click the Login button
4.2 TVProbe SP Console Probe Tab
This tab organizes the Probes that are connected to the system and their channel reports in two layers.
1. All Probes
2. One Probe
The first layer is the All Probes layer that shows all the probes available to the operator along with their reported summary status information.
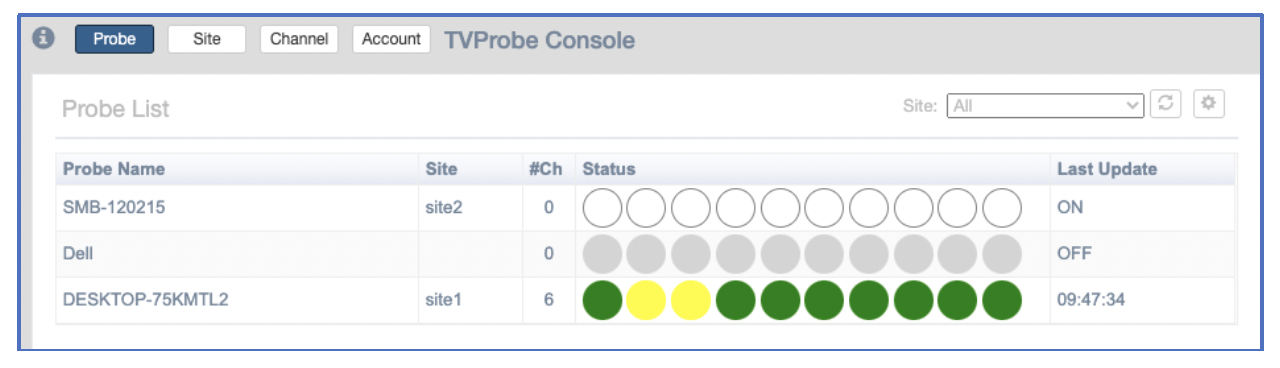
The second layer is the One Probe layer that shows all the channels that are monitored and analyzed by a particular probe.
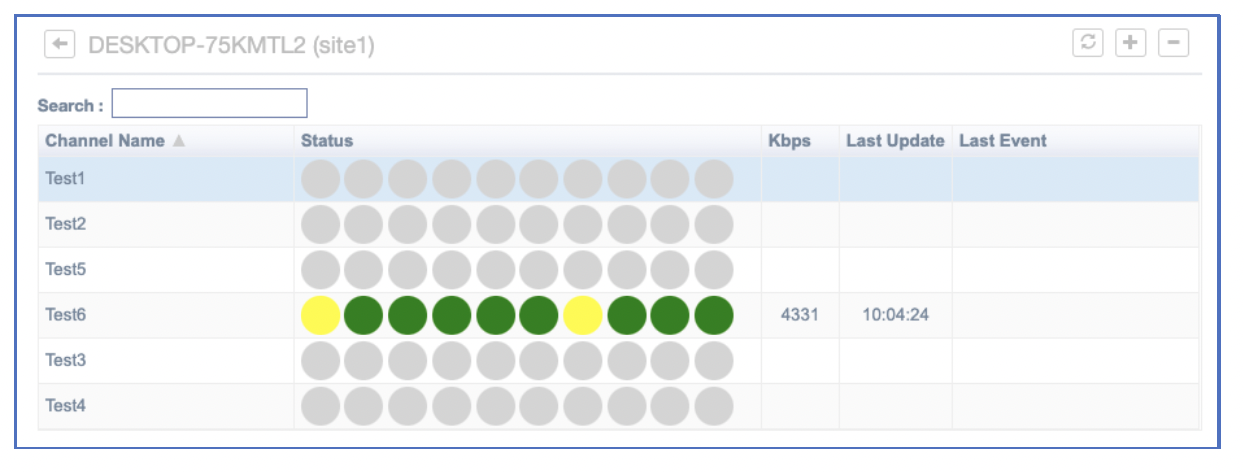
To go from the All Probes layer to the One Probe layer, click any of the status dots of the probe.
To return to the All Probes layer from the One Probe Layer, click the left arrow on the upper left corner.
4.3 TVProbe SP Console Site Tab
This tab organizes the sites specified on the server.
Sites are assigned to probes, and users are assigned to the sites. Sites group channels together for use by probes. Any user assigned to a site this way will receive notifications from any probes marked for notification.
4.4 TVProbe SP Console Channels Tab
This tab organizes the channels designated on the server.
This channel information is what the probe will use to scan the multicast channel streams at its location. A channel added to the source is available at all sites, and sites can override the URL for that specific site. Channels added to a single site are only available on that site. A channel must be added to a site for a probe to be able to probe it.

4.5 TVProbe SP Console Account Tab
This tab organizes the user accounts, both for management and engineers/field technicians.
Users can be setup to receive notifications from specific probes if there are alerts in that probe.
Users may be notified by phone or email.
4.6 Alert Pane
The alert pane has:
• An overall status of all TVProbe Nodes
• The set of alerts of a specified TVProbe Node
• The time of the specified TVProbe Node alert

5. Channel States
TVProbe SP manages a channel in two states, Alert and Normal:
1. A channel is in Normal state if it does not have any of the abovementioned error.
2. A channel is in Alert state when it has at least one of the abovementioned errors.
3. A channel in Alert state resumes Normal state when the channel has no more error through the duration that is specified as the “Alert Reset Period”
The period of time in Alert state is considered the Alert Period.
The Alert Reset Period is configurable and is set to 120 seconds by default.
6. Channel Quality Alerts
TVProbe SP uses the following process in sending channel quality alerts.
When a channel in Normal state has an error
• Sends an exception alert indicating the specific type of error
• Puts the channel in Alert state
• Start Alert Reset Period timer
When a channel in Alert state has an error that has not happened yet in the current Alert Period,
• Sends an exception alert indicating the specific type of error
• Restart Alert Reset Period timer
When a channel in Alert state has an error that has happened earlier in the current Alert Period:
• Restart Alert Reset Period timer
When a channel in Alert state has the Alert Reset Period timer event:
• Sends a reset alert indicating the channel is back to Normal state
• Puts the channel in Normal state
Channel status reports use the following color-code scheme:
• Green: the channel has no error in a reporting period
• Yellow: the channel has at least one error in a reporting period
• Orange: the channel has packet lose
• Red: the channel has no data in the reporting period
7. Set Up TVProbe Nodes, Channels, Users and Alerts
Use TVProbe SP Console to set up TVProbe Nodes, channels, user accounts and alert settings.
7.1 Assign a TVProbe Node to a Site

7.2 Add a User
To add a user for using TVProbe SP:
1. Click the Account tab
2. Click the Add button
3. Enter Login ID, Password, Confirm Password, Name
4. Enter Phone info (optional)
5. Enter Email address, if the user is to receive notifications
6. Check-select Notification if the user is to receive notifications
7. Check-select Admin if the user is to be an administrator
8. Click OK

7.3 Add a User to a Site
To allow a user to be able to monitor the channels of a customer site:
1. Click the Site tab
2. Select the site that the user is to be added to
3. Click the Edit button
4. Check-select the User(s) to be added to the site
5. Click OK

7.4 Configure a User to Receive Alerts
To set up a user to receive alerts:
1. Click the Account tab
2. Select the User to receive notifications
3. Click the Edit button
4. Make sure the user has email address added
5. Make sure the user has notification checked
6. Click OK
7. Click the Probe tab
8. Select the Probe that will be monitored for notifications
9. Click the Setting button ( )
10. Check-select Notification
11. Click OK

7.5 Add a Channel
To add a channel specification for TVProbe Nodes to analyze:
1. Select the site the channel will be added to.
• Channels assigned to Source are available on all sites
2. Click the Add button
3. Enter a Name for the Channel
4. Enter the Source URL for the channel
• Format: udp://@<channel ip>:<channel port>
5. Enter the DRM type
• ‘v’ for Verimatrix encryption
• ‘p’ for Pro:idiom encryption
• NOTE: Leave the field blank if there is no encryption
6. Enter the threshold for when the probe will display a low data rate warning for a channel
7. Click OK, Type and Resolution will fill in automatically

7.6 Assign a Channel to a TVProbe Node
To assign a channel to a TVProbe Node for quality analysis:
1. Channels must first be assigned to the same site that the probe is
2. Enter the status page for the probe
3. Click Add
4. Check Select the channels to be added to the probe
5. Click OK

7.7 Remove Channels from a TVProbe Node
To remove multiple channels at once:
1. Click the Add button
2. Uncheck the channels to be removed
3. Click OK
To remove a single channel:
1. Select the channel to be removed
2. Click Remove
3. Click OK