Vytio IPTV System (Channel Console)
Introduction
The channel console is for the management of channels in the IPTV System. The channels are grouped into lineups and tiers. The management includes:
Mapping channel sources to Vytio’s channel streams. The channel sources could be IGMP v2, IGMP v3, HLS or COAX. The channel sources for the streams are usually not part of the IPTV middleware.
Assigning the channel streams to channel lineups
Assigning the channel streams in a channel lineup to channel tiers
Publishing the channel tiers to the TVs
Mapping channel sources to channel streams
In this example, there are five different channel sources examples to be mapped.


In the above example, channel streams ABC, CNJ and WOO are assigned to the channel lineup “DefaultLineup”. And, channels ABC, ZID and QRC are assigned to the channel lineup FalcomLineup. The same channel stream can be assigned to different lineups.
A single channel lineup with a single channel tier is sufficient in most deployments. Use multiple lineups if there is a need of having different channel numbers for the same channel stream. Use multiple channel tiers in a lineup if there is a need of showing some channels to certain TVs and not others.

In the above example, the channels ABC, CNJ and WOO in the “DefaultLineup” have been assigned to two different channel tiers. The “DefaultTier” will show channels ABC and CNJ while the “MinotaTier” will show channel WOO.
TV Locales assigned to the “DefaultLineup-DefaultTier” will show channels ABC and CNJ but not WOO. Similarly, TV locales assigned to the “DefaultLineup-MinotaTier” will show channel WOO and won’t show ABC nor CNJ.
Details about “Locales” and “Tier” assignments are in the section “Publishing channel tiers to the TVs”.
Publishing channel tiers to the TVs
After the creation of channel tiers, the publication of the channels to the TVs is through a different console, the “Locale” Console. There are two steps in publishing channels to TVs.
Create a Locale group (aka TV group) and assign locales (aka room numbers) to it.
There is a default group called “All Locales”. All locales by default get assigned to this group. More locale groups can be created as needed
The STB/TVs are assigned to locales during registration and therefore automatically belong to locale groups. Reassigning locales to different groups automatically reassigns the STB/TVs in those locales.
Assign the channel tiers to the locale groups.
By default, all locales get assigned to a default group called “All Locales”; And there is a default tier assigned to “All Locales” called “DefaultLineup-DefaultTier”. Different locale groups can be assigned to the same or different channel tiers.
The STB/TVs are assigned to locales during registration and therefore automatically belong to locale groups; Intrinsically, the STB/TVs inherit the channel tiers of their groups.
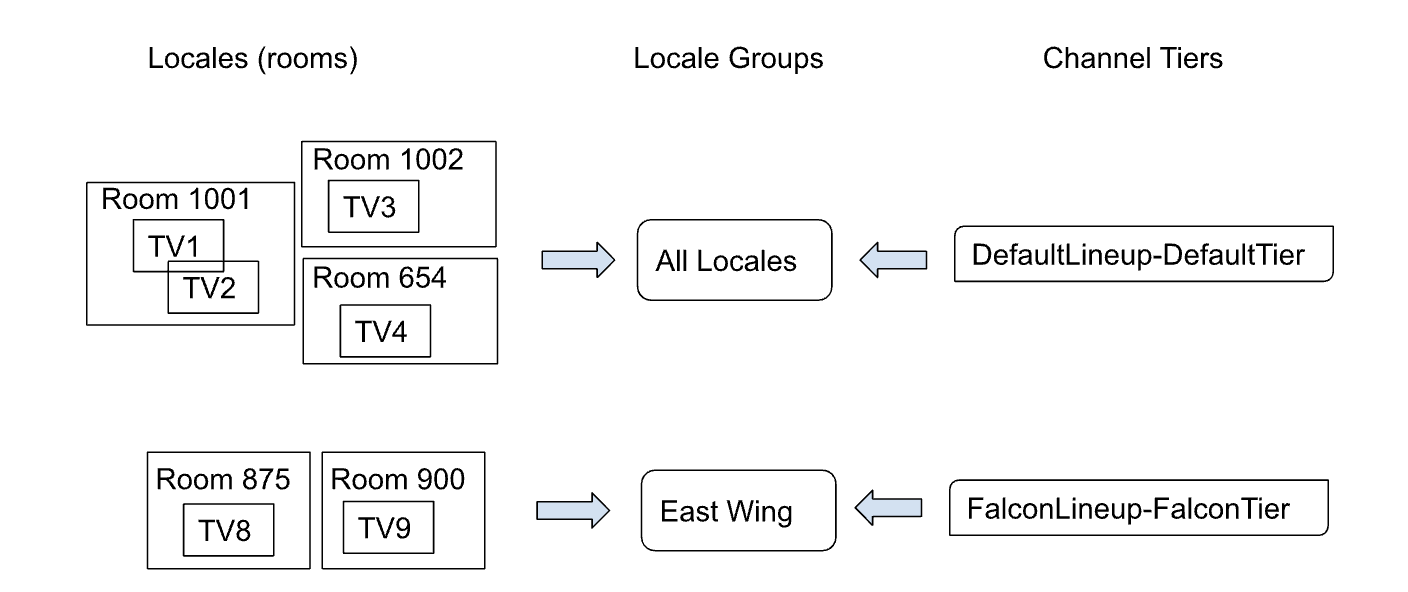
In the above example, rooms 654, 1001 and 1002 are assigned to the “All Locales” group. Also, channel tier “DefaultLineup-DefaultTier” is assigned to the same group. Therefore, TVs TV1, TV2, TV3, and TV4 will show channels in the “DefaultLineup-DefaultTier” channel tier.
Rooms 875 and 900 are assigned to the “East Wing” group. Also, the channel tier “FalcomLineup-FalcomTier” is assigned to the same group. Therefore, TVsTV8 and TV9 will show channels in the “FalconLIneup-FalcomTier” channel tier.
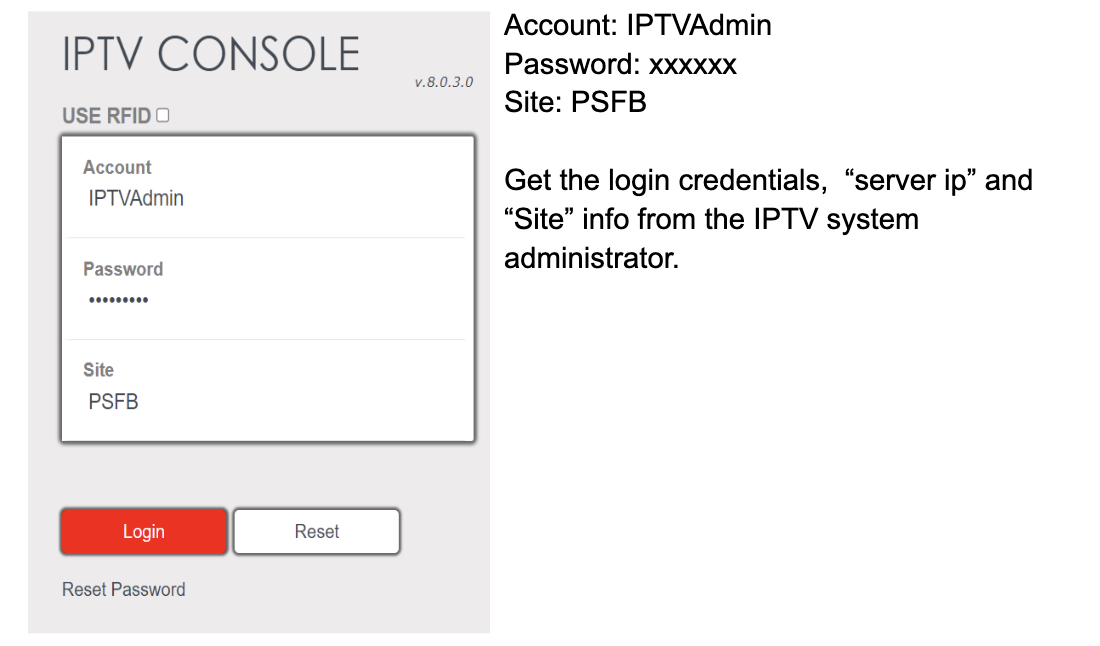
Login
Bring up Chrome browser. Launch the IPTV Console (Enter http://<serverip>/console).
2. Select Channel Console
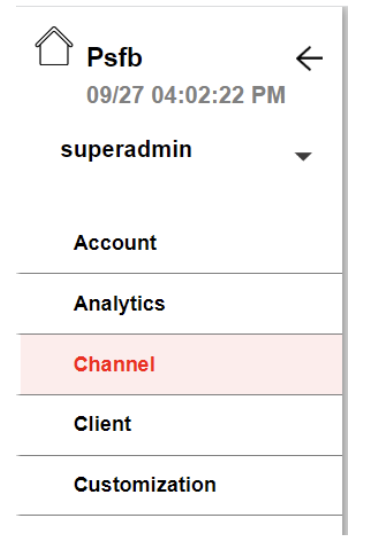
The channel console will be shown as below. The right pane is for channel source management. The left pane is for channel lineup and tier assignment of the channel streams.

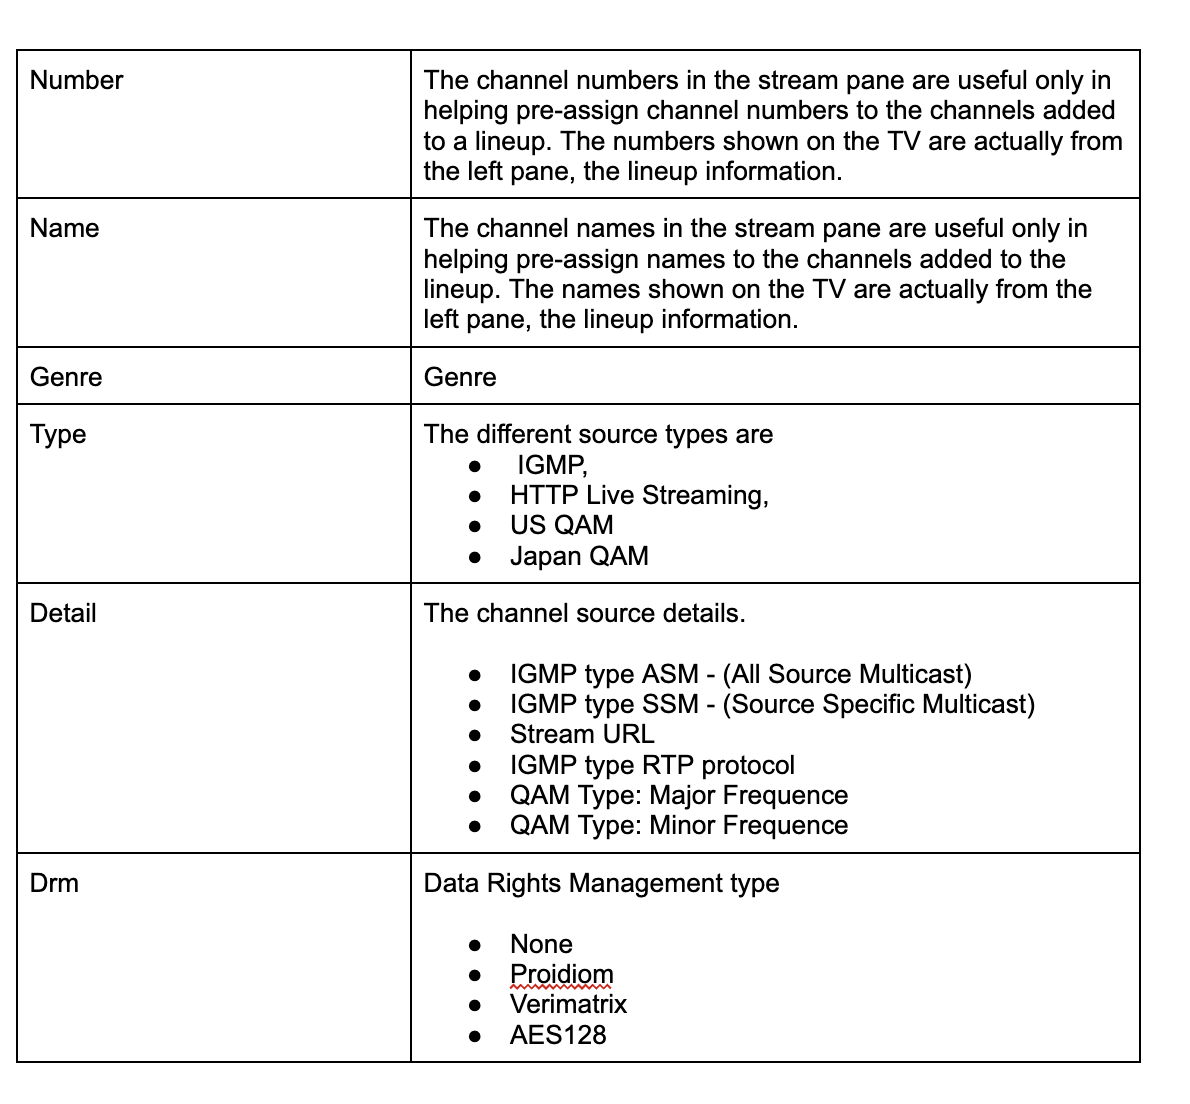
Channel console action button descriptions


Adding an IGMP channel source
Click on Add Stream.

2. Specify a channel number for the stream

3. Click inside the Name field to enter the channel name.

4. Select IGMP as the Type
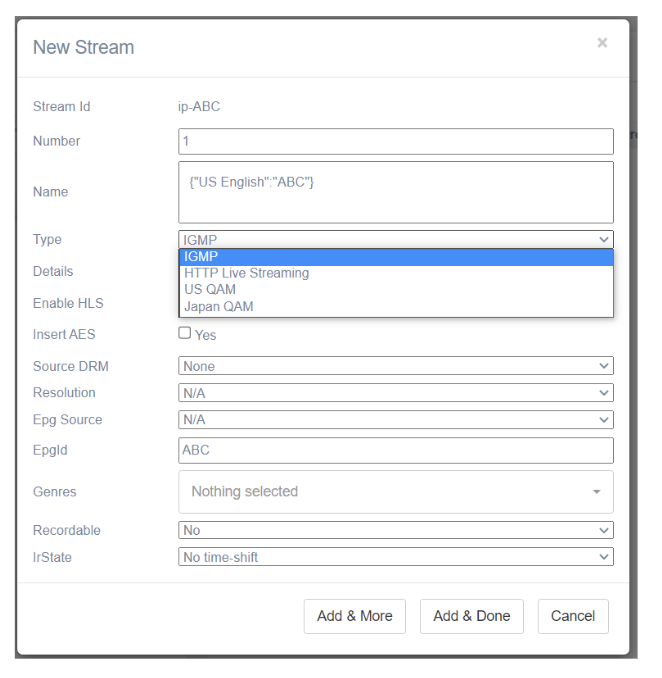
5. Click inside the Details field to add the channel source details

6. Choose the source type, specify the multicast group and port number, select RTP protocol if the channel source has RTP headers.

ASM - Any-source multicast (IGMP version 2)
ASM URL format: <multicast group>:<port> (239.252.1.1:2000)
SSM - Source-specific multicast (IGMP version 3)
SSM URM format: <sourceip>@<multicast group>:<port> (10.2.11.12@239.252.3.40:3000)
RTP Protocol - Real Time Protocol
Check to select RTP; Uncheck to “deselect” RTP
7. Choose the channel source’s DRM type (Digital Rights Management). The supported types include:
None (None means, clear channels)
Pro:idiom
Verimatrix
AES128

8. Click Add & More to add more channel sources or Add & Done to finish.

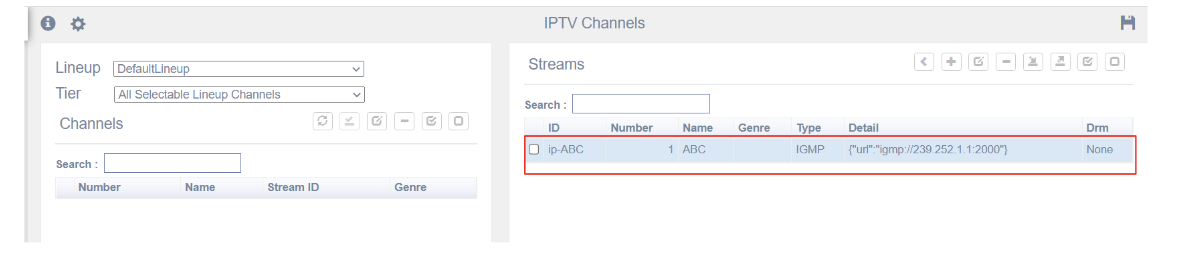
9. The added source will be shown on the right pane as follows:
Creating and Adding a Vytio basic HLS channel stream from a clear IGMP source
The IPTV System supports the creation of an HLS stream from a clear IGMP channel source input. The QuickVideo Internet Mobility (QVIMS) service is used for this purpose. The package is part of the IPTV framework package and requires licensing.
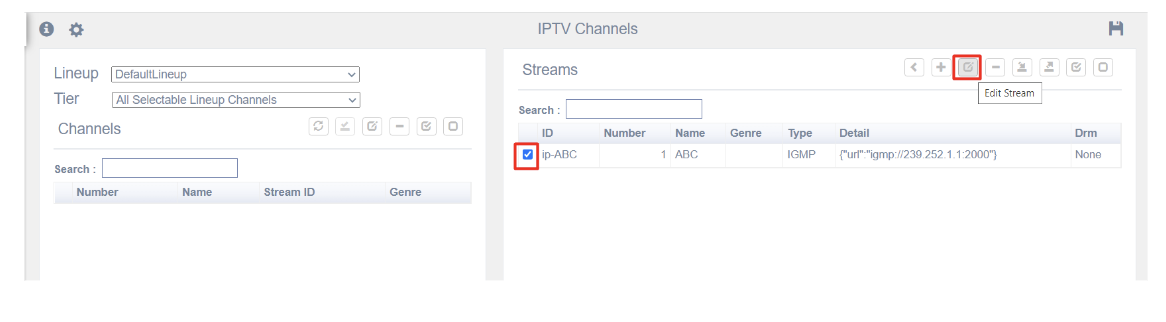
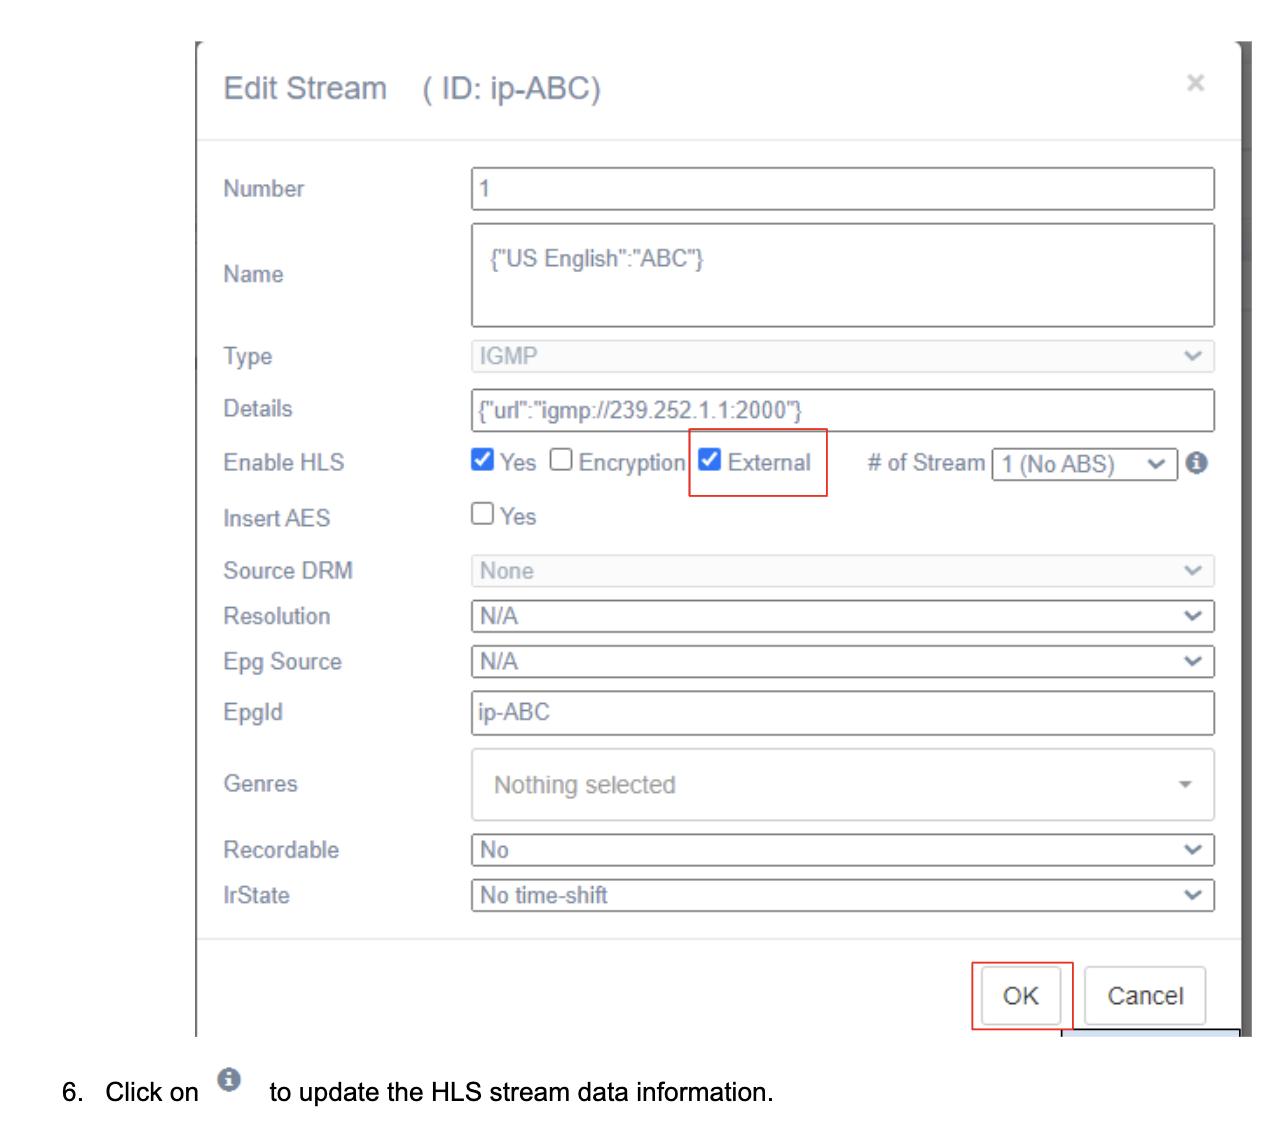
Checkmark an already added igmp channel stream to be used for the creation of the HLS channel stream. Click on to edit the stream (Edit Stream button).
2. Checkmark the Yes option next to Enable HLS.

3. More HLS configuration options will be shown..
Encryption (Encrypt the HLS stream using AES128) - Not needed in this example.
External (Creation of an HLS URL for OffLoad Server usage) - Not needed in this example.
# of Streams (Support multiple Adaptive Bitrate Streaming - ABS). Leave # of Streams set to 1 (No ABS) in this example.


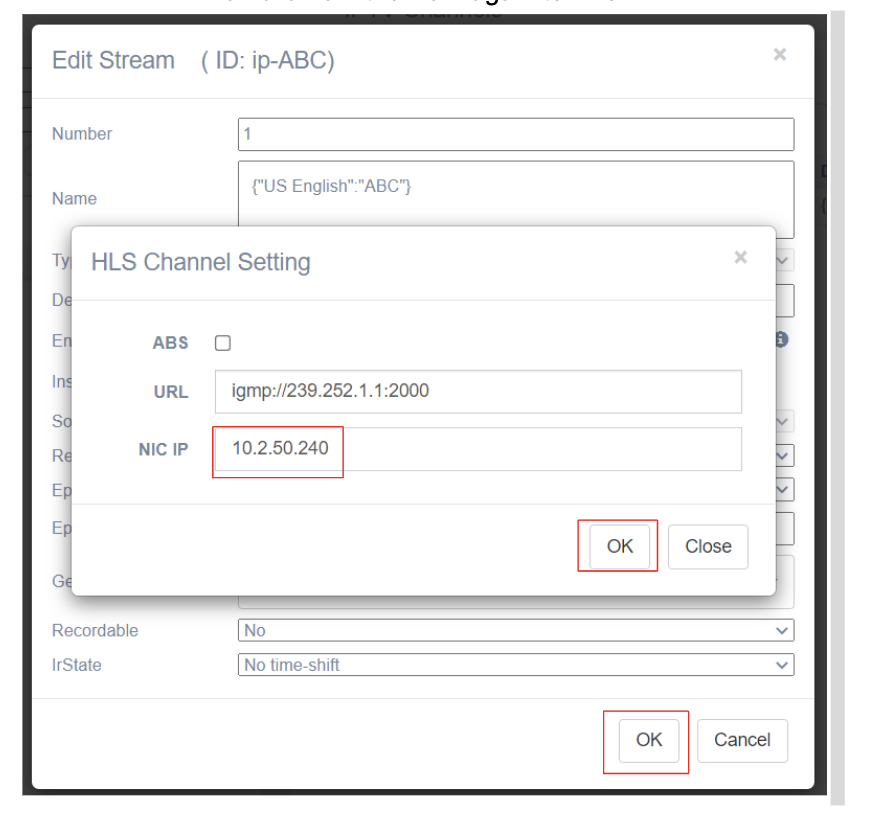
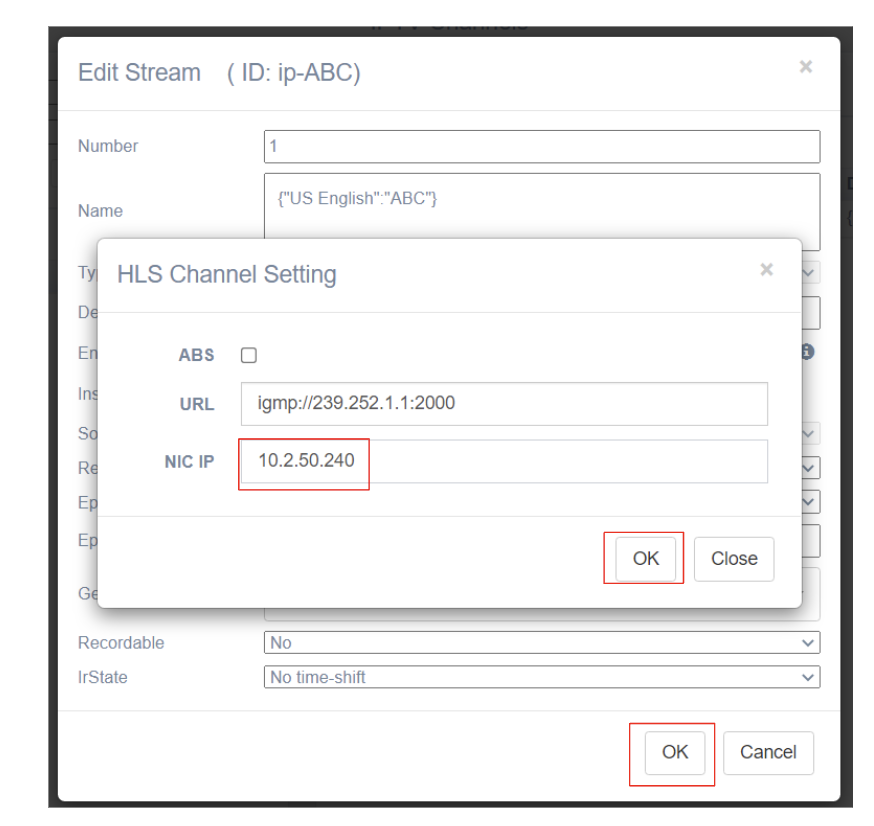
5. Configure the IPTV System’s NIC set to receive the clear IGMP source.
Leave ABS as unchecked.
The URL field will contain the clear IGMP channel source input information.
Enter the IP Address of the IPTV Server NIC set to receive the clear IGMP channel source.
Then click OK then OK again to finish.
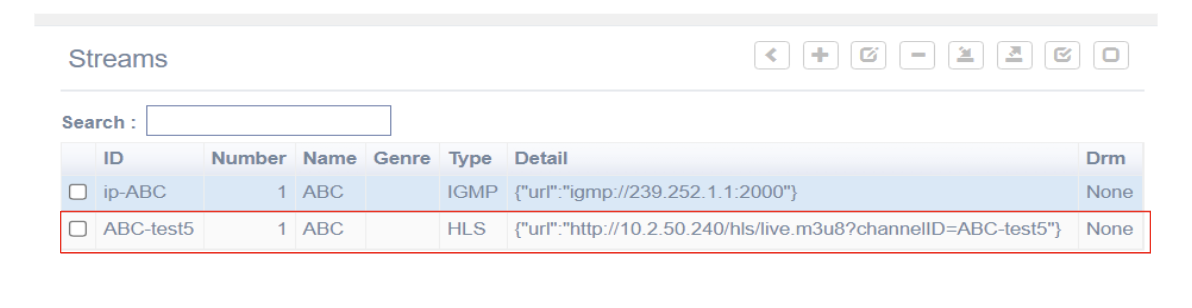
6. The HLS channel stream will be as shown below (http://10.2.50.240/hls/live.m3u8?channelID=ABC-test5)
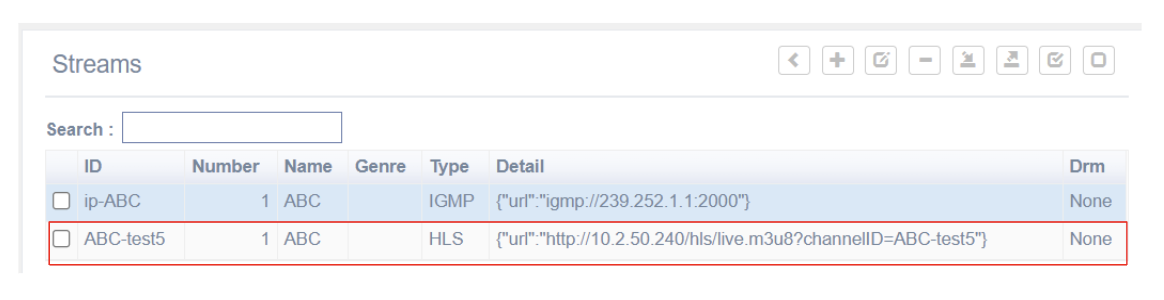
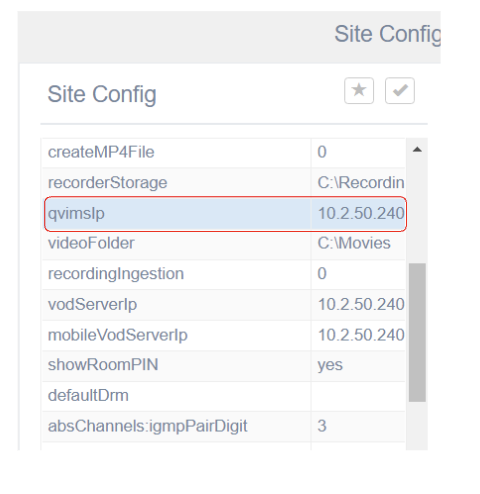
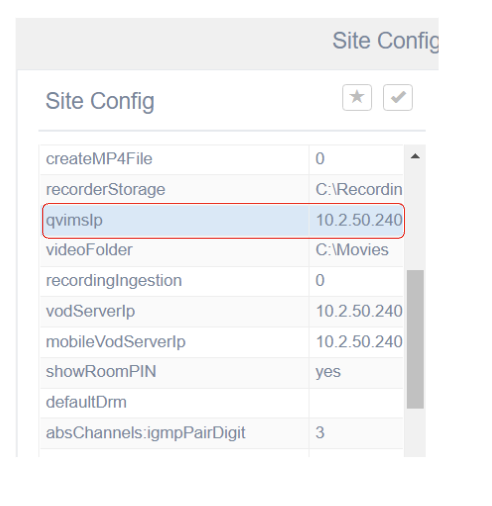
Note: The IP Address <10.2.50.240> in the above example is from the “qvimsip” setting in the site configuration table.
Login to the IPTV Console (including the siteID)
Select “Site Config”.
Search for “qvimsIp”.
Creating and Adding a Vytio HLS channel stream supporting ABS from a clear IGMP source
The IPTV System supports the creation of an HLS stream supporting Adaptive Bitrate Streaming (ABS) from a clear IGMP channel source input. The QuickVideo Internet Mobility (QVIMS) service is used for this purpose. The package is part of the IPTV framework package and requires licensing.
Example:

2. Checkmark the Yes option next to Enable HLS.

3. More HLS configuration options will be shown.
Encryption (Encrypt the HLS stream using AES128) - Not needed in this example.
External (Creation of an HLS URL for OffLoad Server usage) - Not needed in this example.
# of Streams (Support multiple Adaptive Bitrate Streaming - ABS) - Needed in this example.
4. Use the dropdown menu for # of Streams to select the number of ABS streams to be generated.


6. Specify the data rates of the ABS streams.
igmp://239.252.1.1:2000:
QVIMS will use the clear IGMP channel source to create the first ABS stream.
By default, the subsequent ABS streams’ URLs will be the same as that of the clear IGMP channel source except that the third number is increased by one.
igmp://239.252.2.1:2000:
QVIMS will create the second ABS stream using this IP address.
igmp://239.252.3.1:2000:
QVIMS will create the third ABS stream using this IP address.
If there is any channel IP address conflict, change the second and third ABS's IP addresses accordingly.
The specification defining which igmp url digit to change and the increment value is configured in the site configuration table.
Login to the IPTV Console (including the siteID)
Select “Site Config”.
In this example, the third digit is used and the increment is by 1.
igmp://239.252.1.1:2000
igmp://239.252.2.1:2000
igmp://239.252.3.1:2000

Specify the data rates. The default minimum and maximum data rates are defined in the site configuration table.

7. The HLS channel stream will be as shown below (http://10.2.50.240/hls/live.m3u8?channelID=ABC-test5).

Note: The IP Address <10.2.50.240> in the above example is from the “qvimsip” setting in the site configuration table.
Login to the IPTV Console (including the siteID)
Select “Site Config”.
Search for “qvimsIp”.

Creating and Adding an encrypted Vytio HLS channel stream from a clear IGMP source
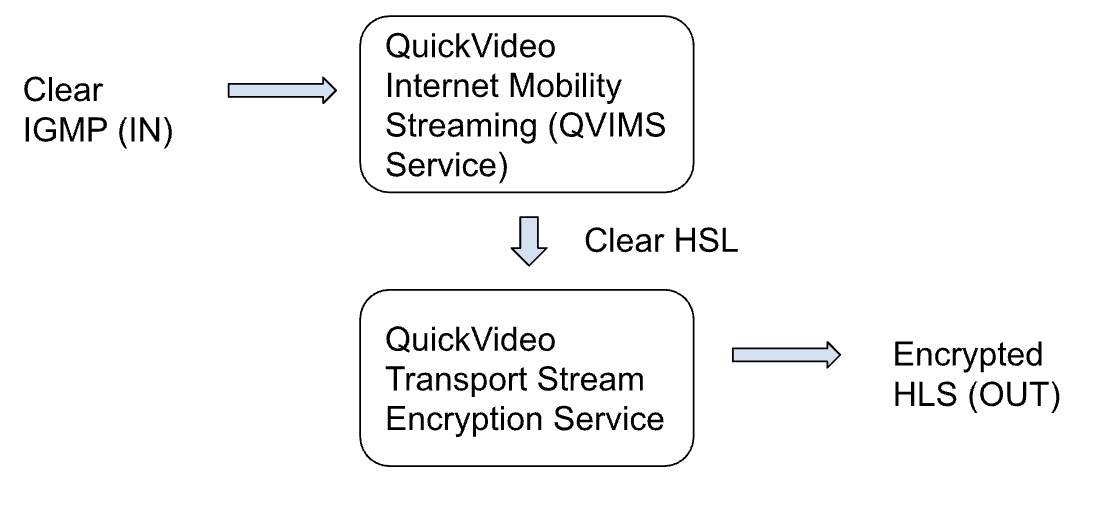
The IPTV system can convert any clear IGMP channel source to a clear HLS channel stream. The clear HSL channel stream can then be encrypted before publishing to PCs for playback. The encryption is done by the QuickVideo Transport Stream Encryption Service. AES128 encryption is used. The playback of the encrypted HLS stream requires a Vytio’s TVZone PC/MAC application.

2. Checkmark the Yes option next to Enable HLS.

3. More HLS configuration options will be shown.
Checkmark Encryption
External (Creation of an HLS URL for OffLoad Server usage) - Not required in this example
# of Streams (Support multiple Adaptive Bitrate Streaming - ABS) - Not required in this example.

5. Configure the NIC set to receive the clear IGMP source.
Leave ABS as unchecked.
Enter the IP Address of the IPTV Server NIC set to receive the clear IGMP channel source.
Then click OK then OK again to finish.
6. The HLS channel stream will be as shown below (http://10.2.50.240/hls/live.m3u8?channelID=ABC-test5)
Note: The IP Address <10.2.50.240> in the above example is a site configuration setting.
Login to the IPTV Console (including the siteID)
Select “Site Config”.
Search for “qvimsIp”.
Creating and Adding a Vytio HLS channel stream from a clear IGMP source for Offlot service
Internal channels can be provided to remote internet users using the OffLot package. The OffLot server is exposed to the internet while the InLot server isn’t. User authentication can be the same as what is used inside the offices or different. The content shown by the internet users can be clear or encrypted.


2. Checkmark the Yes option next to Enable HLS.

3. More HLS configuration options will be shown.
Encryption: (optional)
External: Checkmark External (required)
# of Streams (Support multiple Adaptive Bitrate Streaming - ABS) - Not required in this example.
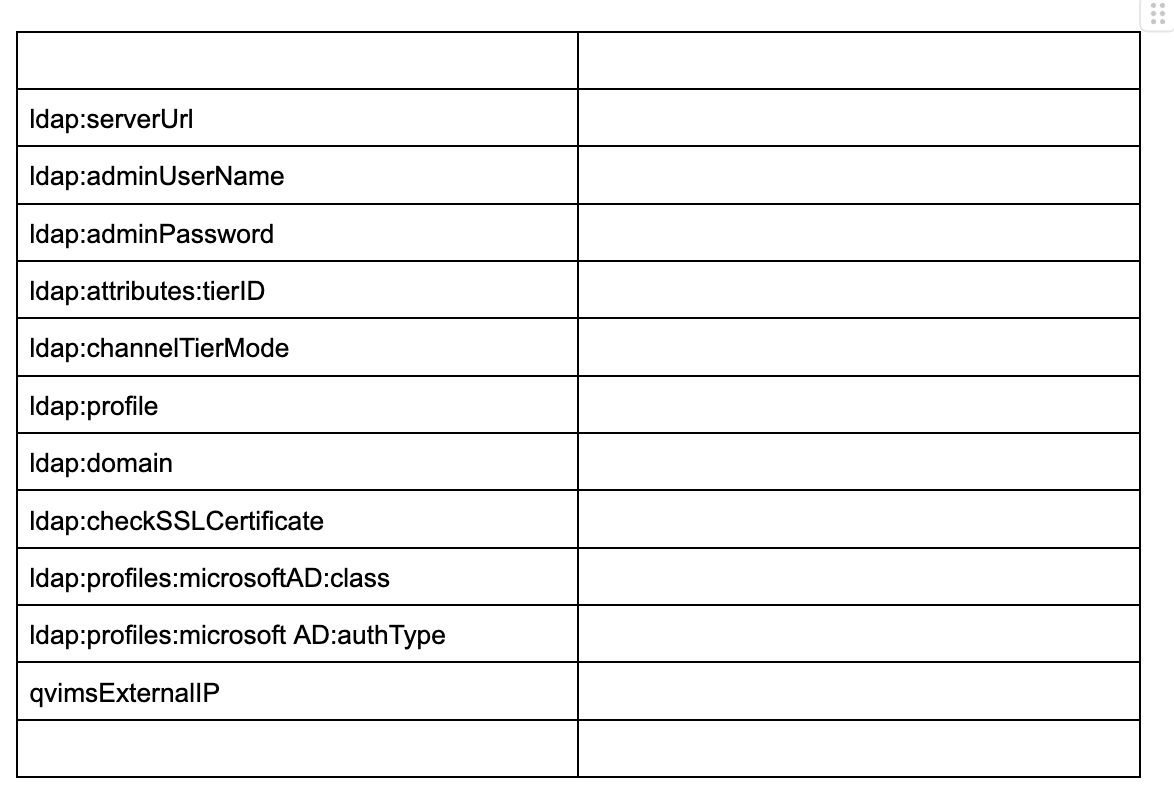
4. Checkmark “External”.A pop-up asking for the QVIMS External IP address will be shown. Enter the IP Address of the OffLot Server (use the internet address if present). Click OK.

5. The option “External” will be shown as selected. Click OK to finish.

7. Configure the NIC set to receive the clear IGMP source.
Leave ABS as unchecked.
Enter the IP Address of the IPTV Server NIC set to receive the clear IGMP channel source.
Then click OK then OK again to finish.
8. There will be two HLS channel streams as shown below:
http://47.22.129.167/hls/live.m3u8?channelID=ABC-test5-ext

Note: The IP Address <10.2.50.240> in the above example is a site configuration setting.
Login to the IPTV Console (including the siteID)
Select “Site Config”.
Search for “qvimsIp”.

InLot Server Configuration
The InLot Server is the internal IPTV server. Its configuration is done in the site configuration table.
Login to the IPTV Console (including the siteID)
Select “Site Config”.
